Android BottomNavigationを追加する
今回は、既存の画面にBottomNavigationを追加します。
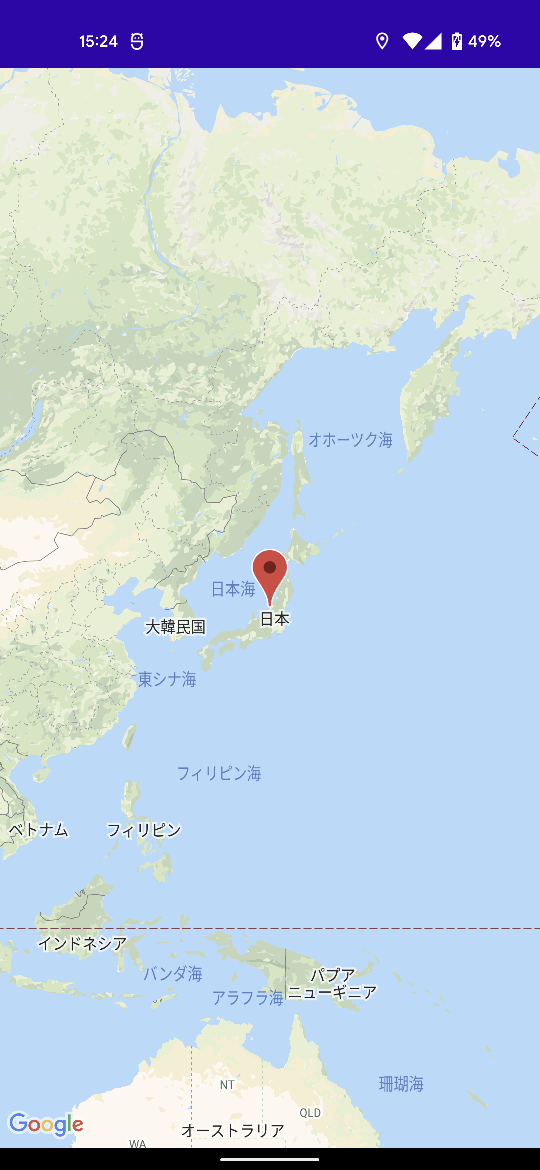
元々はマップのみが表示される画面ですが、右図のようにBottomNavigationを追加していきたいと思います。

手順
ざっくりとした流れは以下の通りです。
- menu.xmlを追加
- layoutの修正
- NavigationBarのタップイベント処理の追加
メニューのxmlを追加
リソースフォルダ下にbottom_nav_menu.xmlを追加します。
※ファイル名はなんでもOK。

<?xml version="1.0" encoding="utf-8"?>
<menu xmlns:android="http://schemas.android.com/apk/res/android">

    <item
        android:id="@+id/navigation_game"
        android:icon="@drawable/baseline_sports_esports_24"
        android:title="@string/title_game" />

    <item
        android:id="@+id/navigation_edit"
        android:icon="@drawable/outline_edit_24"
        android:title="@string/title_edit" />

</menu>
アイコンは、Material Iconsからダウンロードしてきました。
layoutの修正
<修正前>
<?xml version="1.0" encoding="utf-8"?>
<fragment xmlns:android="http://schemas.android.com/apk/res/android"
    xmlns:map="http://schemas.android.com/apk/res-auto"
    xmlns:tools="http://schemas.android.com/tools"
    android:id="@+id/map"
    android:name="com.google.android.gms.maps.SupportMapFragment"
    android:layout_width="match_parent"
    android:layout_height="match_parent"
    tools:context=".MapsActivity" />
<修正後>
BottomNavigationViewを追加しています。
<?xml version="1.0" encoding="utf-8"?>
<androidx.constraintlayout.widget.ConstraintLayout xmlns:android="http://schemas.android.com/apk/res/android"
    xmlns:app="http://schemas.android.com/apk/res-auto"
    xmlns:tools="http://schemas.android.com/tools"
    android:id="@+id/container"
    android:layout_width="match_parent"
    android:layout_height="match_parent">

    <fragment
        android:id="@+id/map"
        android:name="com.google.android.gms.maps.SupportMapFragment"
        android:layout_width="match_parent"
        android:layout_height="0dp"
        app:layout_constraintTop_toTopOf="parent"
        app:layout_constraintBottom_toTopOf="@+id/nav_view"
        tools:context=".MapsActivity" />

    <com.google.android.material.bottomnavigation.BottomNavigationView
        android:id="@+id/nav_view"
        android:layout_width="0dp"
        android:layout_height="wrap_content"
        android:layout_marginStart="0dp"
        android:layout_marginEnd="0dp"
        app:layout_constraintTop_toBottomOf="@+id/map"
        app:layout_constraintBottom_toBottomOf="parent"
        app:layout_constraintLeft_toLeftOf="parent"
        app:layout_constraintRight_toRightOf="parent"
        app:menu="@menu/bottom_nav_menu" />
</androidx.constraintlayout.widget.ConstraintLayout>
Designで表示するとこのようになります。

NavigationBarのタップイベント処理の追加
最後にNavigationBarのイベント処理を追加していきます。
まず、OnItemSelectedListenerのimplementsを追加します。
public class MapsActivity extends FragmentActivity implements
        OnMapReadyCallback, PositionService.OnPositionListener, GoogleMap.OnMarkerClickListener,
        NavigationBarView.OnItemSelectedListener {
次に、onCreate()で、リスナーを登録します。
BottomNavigationView navView = findViewById(R.id.nav_view);
navView.setOnItemSelectedListener(this);
そして、onNavigationItemSelectedメソッドを実装して、イベントを処理します。 今回は、BottomNavigationに、GameとEditのメニューを設置しており、ゲームモードと編集モードを切り替えられるようにしました。
@Override
public boolean onNavigationItemSelected(@NonNull MenuItem item) {
    if (R.id.navigation_game == item.getItemId()) {
        mode = MODE_GAME;
    } else {
        mode = MODE_EDIT;
    }

    return true;
}
ソース
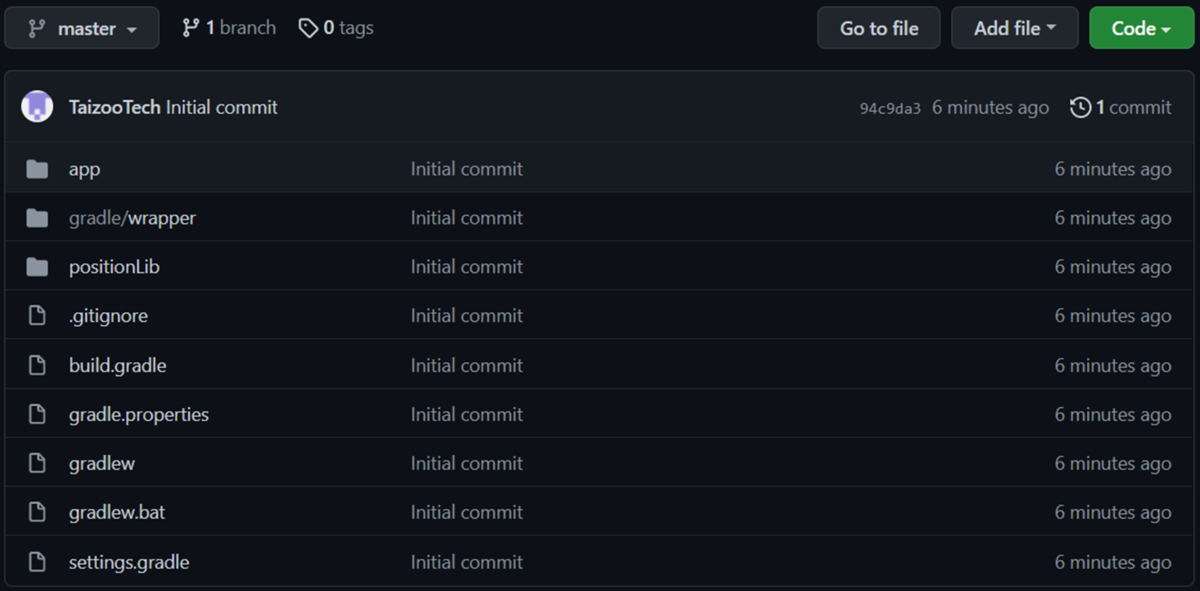
ソース全体は、Githubに登録しています。
GitHub - TaizooTech/SampleMap
参考
BottomNavigationView入門 - Qiita
AndroidでBottomNavigationBarを実装してみる - Re:30からはじめるエンジニア生活(仮)
Google Fonts
AndroidStudioからGithubへ登録する
今回はAndroidStudioからプロジェクトをGithubへ登録する方法を勉強していきます。Githubのアカウントだけは既に所有していたので、アカウント作成方法は割愛します。
目次
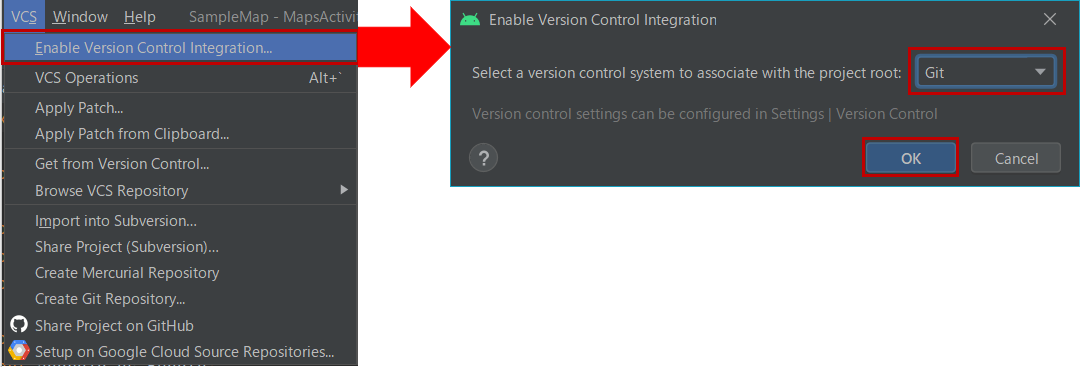
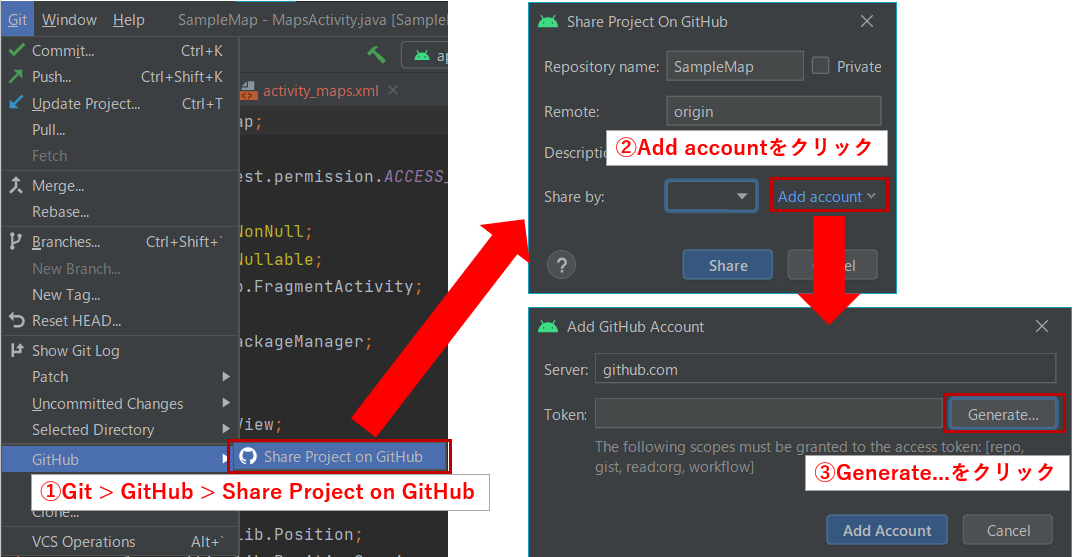
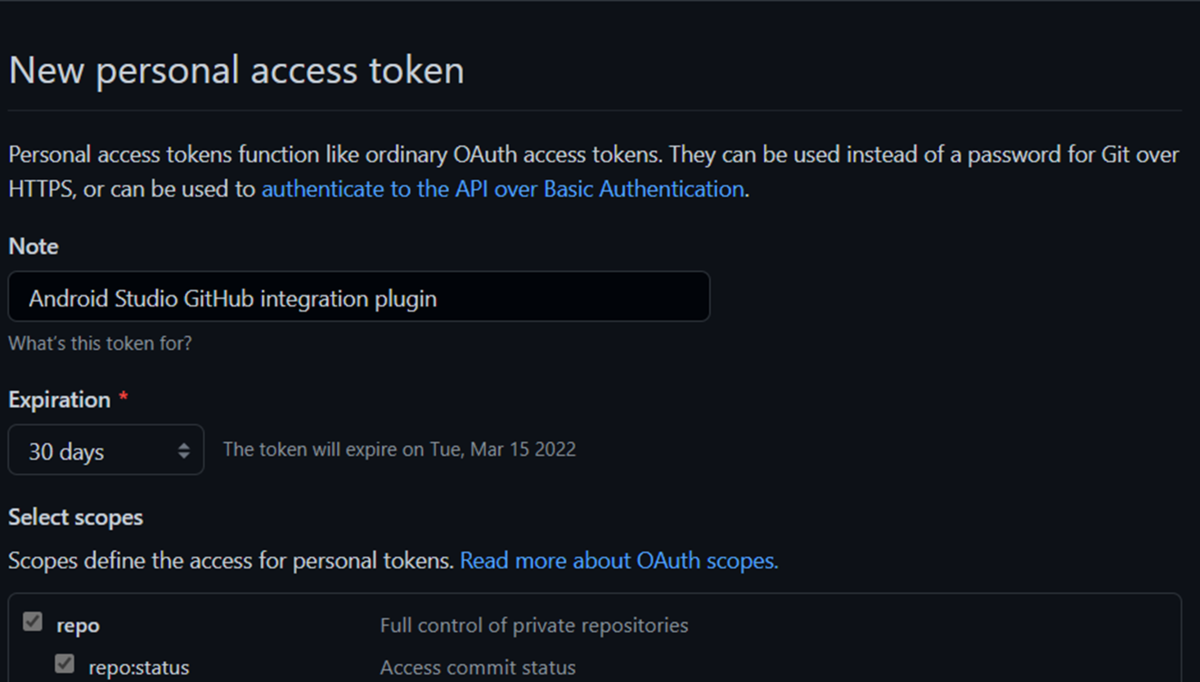
Android Studio Bumblebee 2021.1.1 Patch 1 そもそも理解が曖昧だったので、、 ①メニュー > VCS > Enable Version Control Integration... "Generate"をクリックすると、下図のようにブラウザが起動してGithubのページが表示されます。ページに従いトークンを発行し、先程のToken欄にコピペします。
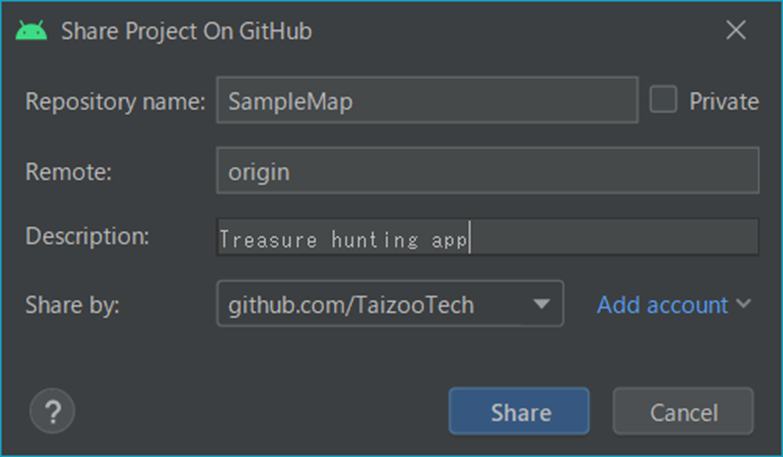
その後、"Add Account"ボタンをクリックします。
正常に識別されると、下図のようにShare by欄に自分のGithubのアカウントが表示されます。 コミットに成功すると、下図のようにGithubに登録されたソースを確認できます。
実際に登録したプロジェクトは、以下です。 ほとんど参考サイトのとおりに作業ができました。環境
GitとGithub
バージョン管理を有効化
②プルダウンで"Git"を選択し、"OK"をクリック
Githubとの連携
登録するソースを選択し、コミット
ありがとうございます。参考
Android Stutdio ライブラリプロジェクトを作る
前回は、GoogleMapの吹き出しをカスタマイズしました。
実際に子供と遊ぶことで、色々な改善点が見えてきました。
そこで今回は、今後の改修とGitでの管理を見据えてソースを少し整理していきます。
目次
下図のようにsetting.gradleとbuild.gradleにそれぞれ1行追記すればOK。
なお、setting.gradleへの追記は、ライブラリプロジェクトを追加した際に、AndroidStudioが自動でやってくれました。
ライブラリモジュール(postionLib)に位置情報関連とセンサー関連の処理を移動させることで、appモジュール内がスッキリました。 今回は、ライブラリプロジェクトを作成し、ソースの構造を整理しました。
基本的には、 の2ステップでできました。方針
流れ
やってみる
①ライブラリモジュールの追加
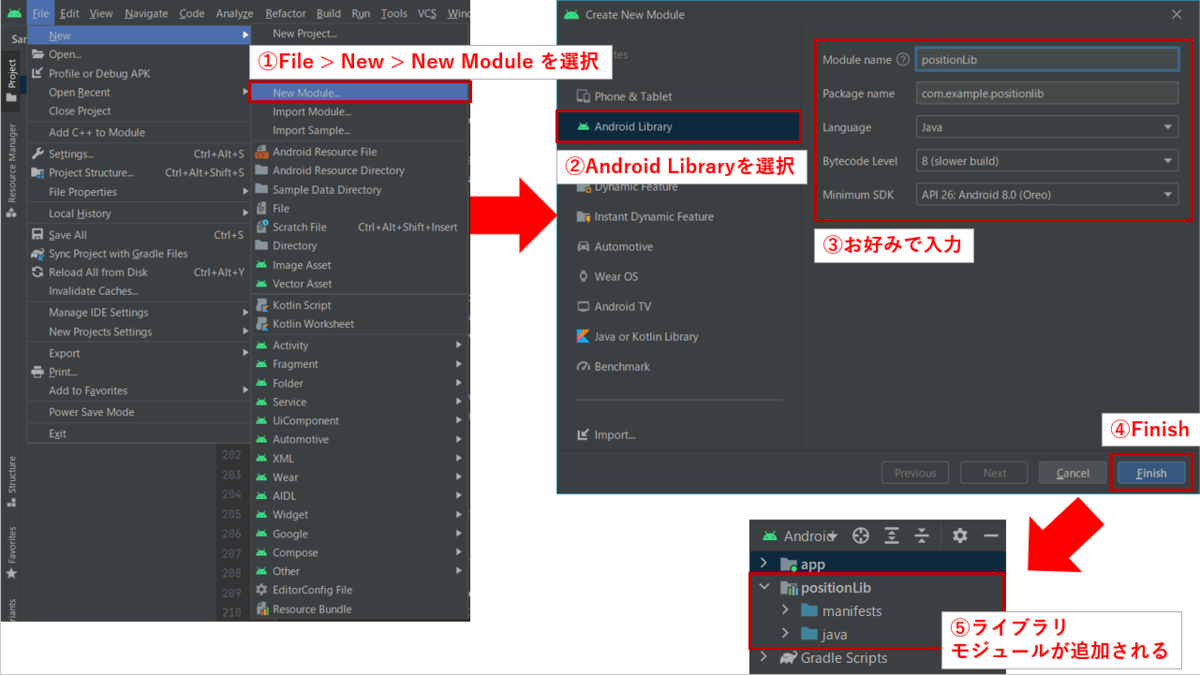
②ライブラリモジュールへの参照を追加

③ライブラリモジュールの実装

まとめ
ソースが少し整ったので、次はGithubへの登録してみたいと思います。
Android GoogleMapのInfoWindow(吹き出し)をカスタマイズする その2
前回は、InfoWindowをカスタマイズし、吹き出しに画像とタイトルと説明を表示できるようにしました。今回は、吹き出しの画像、タイトル、説明を自由に入力できるようにしていきます。
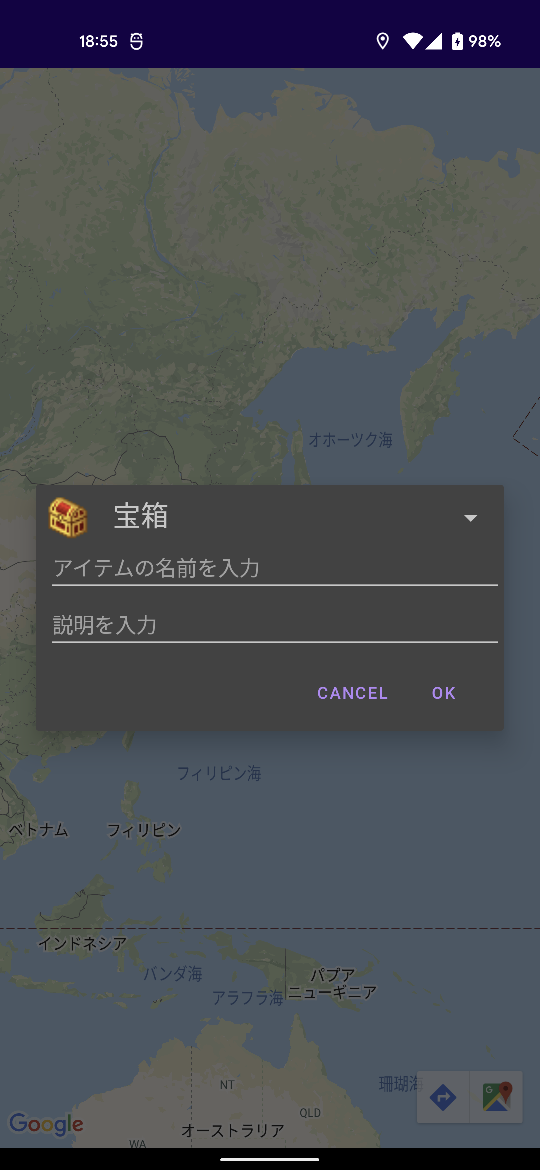
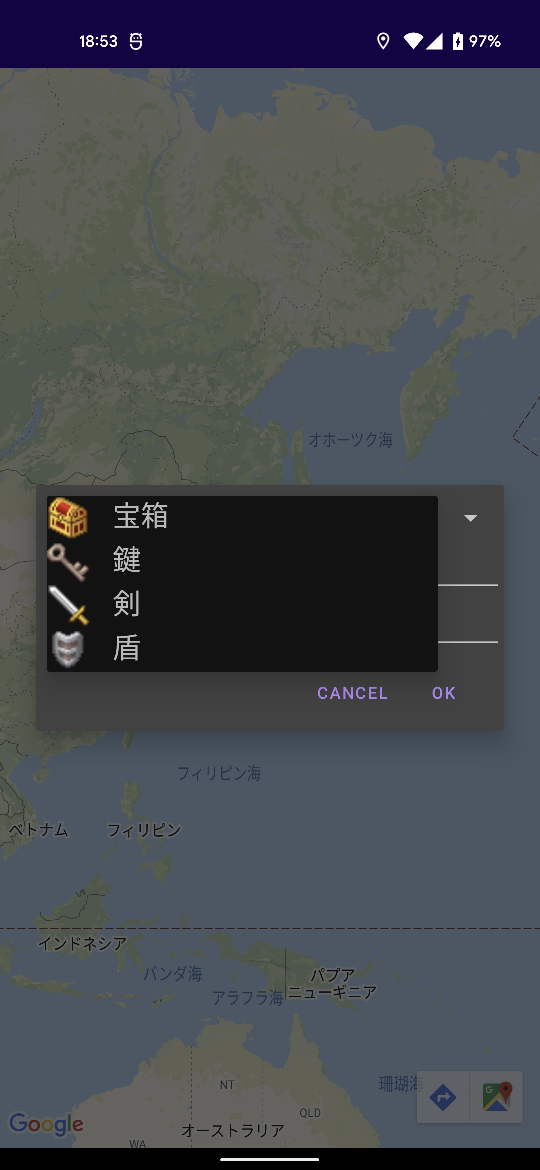
先に概要です。 今回のポイントは、次の三点です。 ②ダイアログの入力内容をMarkerのタグで保持する。 ③吹き出しを描画するタイミング(getInfoContents())で、Markerのタグから入力内容を取得し、吹き出しに反映する。 これで以下のことができるようになりました。 本アプリは、子供(4才)と一緒に宝探しゲームをすることを目的に作っています。
そのため、アイコンはRPGチックなものをチョイスしています。
試しに公園で試してみたところ、以下の改善点が見つかりました。 また、ソース全文を載せると長くなってしまうので、今後はGitに登録するようにしたい。 [Android] Spinner をカスタマイズして画像リストを表示する ダイアログ | Android デベロッパー | Android Developers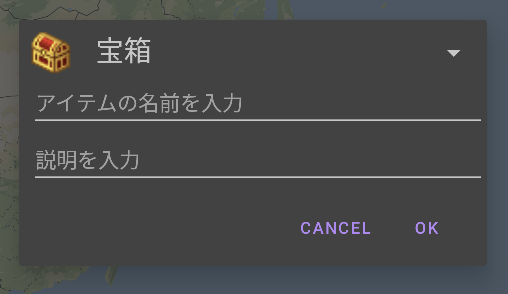
方針
ソースコード
MyDialogFragment.java
public class MyDialogFragment extends DialogFragment {

    private OnDialogFragmentListener listener;

    public interface OnDialogFragmentListener {
        void onDialogResult(int selectedItemResourceId, String title, String snippet);
    }

    public void setDialogFragmentListener(OnDialogFragmentListener listener) {
        this.listener = listener;
    }

    @NonNull
    public Dialog onCreateDialog(@Nullable Bundle savedInstanceState) {

        // カスタムダイアログのビューを生成
        View dialogView = requireActivity().getLayoutInflater().inflate(R.layout.custom_dialog, null);

        // 吹き出しに表示する画像を選択するスピナーを生成
        SpinnerAdapter adapter = new SpinnerAdapter(getActivity());
        Spinner spinner = dialogView.findViewById(R.id.sp_icon);
        spinner.setAdapter(adapter);

        // ダイアログの作成
        AlertDialog.Builder builder = new AlertDialog.Builder(getActivity());
        builder.setView(dialogView)
                .setPositiveButton("OK", new DialogInterface.OnClickListener() {
                    @Override
                    public void onClick(DialogInterface dialog, int which) {
                        // ダイアログでOKをクリックした場合の操作
                        if (null != listener) {
                            // リスナー登録されている場合、リソースIDとタイトルと説明の情報を返却する
                            listener.onDialogResult(
                                (int)adapter.getItem(spinner.getSelectedItemPosition()),
                                ((EditText) dialogView.findViewById(R.id.et_title)).getText().toString(),
                                ((EditText) dialogView.findViewById(R.id.et_snipet)).getText().toString()
                            );
                        }
                    }
                })
                .setNegativeButton("Cancel", null);

        return builder.create();
    }
}
SpinnerAdapter.java
public class SpinnerAdapter extends BaseAdapter {

    private final LayoutInflater inflater;
    private final int[] imageIDs;
    private final String[] itemNames;

    public SpinnerAdapter(Context context) {
        inflater = LayoutInflater.from(context);

        // スピナーに登録する画像の名前リストをstring.xmlから取得
        String[] spinnerImages = context.getResources().getStringArray(R.array.spinner_image_names);
        itemNames = context.getResources().getStringArray(R.array.spinner_item_names);

        // 画像のリソースIDリストを取得
        imageIDs = new int[spinnerImages.length];
        for (int i=0; i < spinnerImages.length; i++) {
            imageIDs[i] = context.getResources().getIdentifier(
                    spinnerImages[i],
                    "drawable",
                    context.getPackageName());
        }
    }

    @Override
    public int getCount() {
        return imageIDs.length;
    }

    @Override
    public Object getItem(int position) {
        return imageIDs[position];
    }

    @Override
    public long getItemId(int position) {
        return position;
    }

    @Override
    public View getView(int position, View convertView, ViewGroup parent) {

        if (null == convertView) {
            convertView = inflater.inflate(R.layout.spinner_layout, null);
        }

        ((ImageView) convertView.findViewById(R.id.iv_item)).setImageResource(imageIDs[position]);
        ((TextView) convertView.findViewById(R.id.tv_item)).setText(itemNames[position]);
        return convertView;
    }
}
custom_dialog.xml
<?xml version="1.0" encoding="utf-8"?>
<androidx.constraintlayout.widget.ConstraintLayout xmlns:android="http://schemas.android.com/apk/res/android"
    xmlns:app="http://schemas.android.com/apk/res-auto"
    xmlns:tools="http://schemas.android.com/tools"
    android:layout_width="match_parent"
    android:layout_height="match_parent"
    android:paddingLeft="8dp"
    android:paddingTop="8dp">

    <Spinner
        android:id="@+id/sp_icon"
        android:layout_width="match_parent"
        android:layout_height="wrap_content"
        app:layout_constraintStart_toStartOf="parent"
        app:layout_constraintTop_toTopOf="parent" />

    <EditText
        android:id="@+id/et_title"
        android:layout_width="match_parent"
        android:layout_height="wrap_content"
        android:ems="10"
        android:hint="@string/item_title_hint"
        android:inputType="textPersonName"
        app:layout_constraintStart_toStartOf="parent"
        app:layout_constraintTop_toBottomOf="@+id/sp_icon" />

    <EditText
        android:id="@+id/et_snipet"
        android:layout_width="match_parent"
        android:layout_height="wrap_content"
        android:ems="10"
        android:hint="@string/item_snipet_hint"
        android:inputType="textPersonName"
        app:layout_constraintStart_toStartOf="parent"
        app:layout_constraintTop_toBottomOf="@+id/et_title" />

</androidx.constraintlayout.widget.ConstraintLayout>
spinner_layout.xml
<?xml version="1.0" encoding="utf-8"?>
<LinearLayout xmlns:android="http://schemas.android.com/apk/res/android"
    android:layout_width="match_parent"
    android:layout_height="match_parent"
    android:orientation="horizontal">

    <!-- アイコンを表示するイメージビュー -->
    <ImageView
        android:id="@+id/iv_item"
        android:layout_width="32dp"
        android:layout_height="32dp" />

    <TextView
        android:id="@+id/tv_item"
        android:layout_width="wrap_content"
        android:layout_height="wrap_content"
        android:layout_weight="1"
        android:paddingLeft="16dp"
        android:textSize="24sp" />

</LinearLayout>
MapsActivity.java
public class MapsActivity extends FragmentActivity implements OnMapReadyCallback {

    private GoogleMap mMap;
    private ActivityMapsBinding binding;
    private Marker marker;
    private FusedLocationProviderClient flpClient = null;
    private MySensorManager mySensorManager = null;
    private LocationCallback locationCallback = null;
    private LatLng tmpLatLng;

    @Override
    protected void onCreate(Bundle savedInstanceState) {
        super.onCreate(savedInstanceState);

        binding = ActivityMapsBinding.inflate(getLayoutInflater());
        setContentView(binding.getRoot());

        SupportMapFragment mapFragment = (SupportMapFragment) getSupportFragmentManager()
                .findFragmentById(R.id.map);
        mapFragment.getMapAsync(this);

        // 位置情報が変更された際に、通知を受け取るコールバックメソッドを定義
        locationCallback = new LocationCallback() {
            @Override
            public void onLocationResult(@NonNull LocationResult locationResult) {
                super.onLocationResult(locationResult);
                Location location = locationResult.getLastLocation();
                LatLng latlng = new LatLng(location.getLatitude(), location.getLongitude());
                mMap.moveCamera(CameraUpdateFactory.newLatLng(latlng));
                marker.setPosition(latlng);
                marker.setRotation(mySensorManager.getAzimuth());
            }
        };

        mySensorManager = new MySensorManager(this);
    }

    @Override
    protected void onResume() {
        super.onResume();
        startPositioning();
    }

    @Override
    protected void onPause() {
        super.onPause();
        stopPositioning();
    }

    @Override
    public void onMapReady(GoogleMap googleMap) {
        mMap = googleMap;
        LatLng sydney = new LatLng(-34, 151);
        marker = mMap.addMarker(new MarkerOptions().position(sydney).title("Marker in Sydney"));
        marker.setIcon(BitmapDescriptorFactory.fromResource(R.drawable.marker));
        mMap.moveCamera(CameraUpdateFactory.newLatLng(sydney));

        mMap.setInfoWindowAdapter(new GoogleMap.InfoWindowAdapter() {

            @Override
            public View getInfoContents(@NonNull Marker marker) {

                // info_window_layout.xml のビューを生成
                View view = getLayoutInflater().inflate(R.layout.info_window_layout, null);

                // イメージビューを取得
                ImageView imgView = view.findViewById(R.id.imageView);

                InfoContents contents = (InfoContents) marker.getTag();
                if (null == contents) {
                    return null;
                }

                imgView.setImageResource(contents.resourceId);
                ((TextView) view.findViewById(R.id.tv_title)).setText(contents.title);
                ((TextView) view.findViewById(R.id.tv_snipet)).setText(contents.snipet);

                return view;
            }

            @Nullable
            @Override
            public View getInfoWindow(@NonNull Marker marker) {
                return null;
            }
        });

        // 長押しクリックイベントをセット
        mMap.setOnMapLongClickListener(new GoogleMap.OnMapLongClickListener() {
            @Override
            public void onMapLongClick(@NonNull LatLng latLng) {

                tmpLatLng = latLng;

                // アイコン選択ダイアログを表示
                MyDialogFragment dialogFragment = new MyDialogFragment();
                dialogFragment.setDialogFragmentListener(listener);
                dialogFragment.show(getSupportFragmentManager(), "custom_dialog");
            }
        });
    }

    private final MyDialogFragment.OnDialogFragmentListener listener =
            new MyDialogFragment.OnDialogFragmentListener() {
        @Override
        public void onDialogResult(int selectedItemResourceId, String title, String snippet) {
            // 長押しクリックイベントをキャッチしたらマーカーを追加
            Marker itemMarker = mMap.addMarker(new MarkerOptions().position(tmpLatLng));

            InfoContents contents = new InfoContents();
            contents.resourceId = selectedItemResourceId;
            contents.title = title;
            contents.snipet = snippet;

            itemMarker.setTag(contents);
        }
    };

    @Override
    public void onRequestPermissionsResult(int requestCode, String permissions[], int[] grantResults) {
        super.onRequestPermissionsResult(requestCode, permissions, grantResults);
        if (1 != requestCode) {
            return;
        }

        // ユーザが許可してくれた場合は、位置情報の取得を開始する
        if (grantResults.length > 0 && grantResults[0] == PackageManager.PERMISSION_GRANTED) {
            startPositioning();
        } else {
            Toast.makeText(this, "Permission Error.", Toast.LENGTH_SHORT).show();
        }
    }

    /**
     * 位置情報の取得を開始する。
     */
    private void startPositioning() {

        // 位置情報へのアクセス許可チェック
        if (!checkPermission()) {
            return;
        }

        // 位置情報のリクエストを生成する
        LocationRequest request = LocationRequest.create();
        request.setInterval(1000);
        request.setPriority(LocationRequest.PRIORITY_HIGH_ACCURACY);

        // 位置情報の更新をリクエストする
        flpClient = LocationServices.getFusedLocationProviderClient(this);
        flpClient.requestLocationUpdates(request, locationCallback, null);

        // センサーの取得を開始
        mySensorManager.startSensor();
    }

    /**
     * 位置情報の取得を停止する。
     */
    private void stopPositioning() {
        if (null != flpClient) {
            flpClient.removeLocationUpdates(locationCallback);
        }

        if (null != mySensorManager) {
            mySensorManager.stopSensor();
        }
    }

    /**
     * 位置情報へのアクセスが許可されているかチェックする。<br>
     * 許可されていてない場合、パーミッションリクエストを行う。
     * @return ture:許可 / false:未許可
     */
    private boolean checkPermission() {
        // アクセス許可チェック
        if (checkSelfPermission(ACCESS_FINE_LOCATION) == PackageManager.PERMISSION_GRANTED) {
            return true;
        }

        // パーミッションリクエスト
        requestPermissions(new String[] {ACCESS_FINE_LOCATION},1);
        return false;
    }

    /**
     * 吹き出しに表示するコンテンツを保持するクラス
     */
    private class InfoContents {
        private int resourceId;
        private String title;
        private String snipet;

    }
}
今回のポイント
①ダイアログでの入力内容をコールバックで通知する。 AlertDialog.Builder builder = new AlertDialog.Builder(getActivity());
builder.setView(dialogView)
.setPositiveButton("OK", new DialogInterface.OnClickListener() {
@Override
public void onClick(DialogInterface dialog, int which) {
// ダイアログでOKをクリックした場合の操作
if (null != listener) {
// リスナー登録されている場合、リソースIDとタイトルと説明の情報を返却する
listener.onDialogResult(
(int)adapter.getItem(spinner.getSelectedItemPosition()),
((EditText) dialogView.findViewById(R.id.et_title)).getText().toString(),
((EditText) dialogView.findViewById(R.id.et_snipet)).getText().toString()
);
}
}
})
.setNegativeButton("Cancel", null);
    private final MyDialogFragment.OnDialogFragmentListener listener =
            new MyDialogFragment.OnDialogFragmentListener() {
        @Override
        public void onDialogResult(int selectedItemResourceId, String title, String snippet) {
            // 長押しクリックイベントをキャッチしたらマーカーを追加
            Marker itemMarker = mMap.addMarker(new MarkerOptions().position(tmpLatLng));

            InfoContents contents = new InfoContents();
            contents.resourceId = selectedItemResourceId;
            contents.title = title;
            contents.snipet = snippet;

            itemMarker.setTag(contents);
        }
    };
            @Override
            public View getInfoContents(@NonNull Marker marker) {

                // info_window_layout.xml のビューを生成
                View view = getLayoutInflater().inflate(R.layout.info_window_layout, null);

                // イメージビューを取得
                ImageView imgView = view.findViewById(R.id.imageView);

                InfoContents contents = (InfoContents) marker.getTag();
                if (null == contents) {
                    return null;
                }

                imgView.setImageResource(contents.resourceId);
                ((TextView) view.findViewById(R.id.tv_title)).setText(contents.title);
                ((TextView) view.findViewById(R.id.tv_snipet)).setText(contents.snipet);

                return view;
            }
実行結果

今後の課題
次回以降改善していきたいと思います。
→ジオフェンスで音を鳴らす等イベントを増やす
→マップ中心座標の更新ON/OFFをスイッチできるようにする
→通常の地図と航空写真をスイッチできるようにする参考
リファレンス
素材について
Android GoogleMapのInfoWindow(吹き出し)をカスタマイズする
今回は、
- GoogleMapのタッチイベントを拾ってアイコンを表示する
- InfoWindow(吹き出し)をカスタマイズする
の2点をやっていきたいと思います。
方針
- 長押しクリックイベントは、GoogleMap.setOnMapLongClickListener()を使って拾う
- 吹き出しのカスタマイズは、独自のレイアウトを定義する
- レイアウトは、左側にアイコン、右側にタイトルと説明を表示する
ソースコード
先にレイアウトです。
info_window_layout.xml
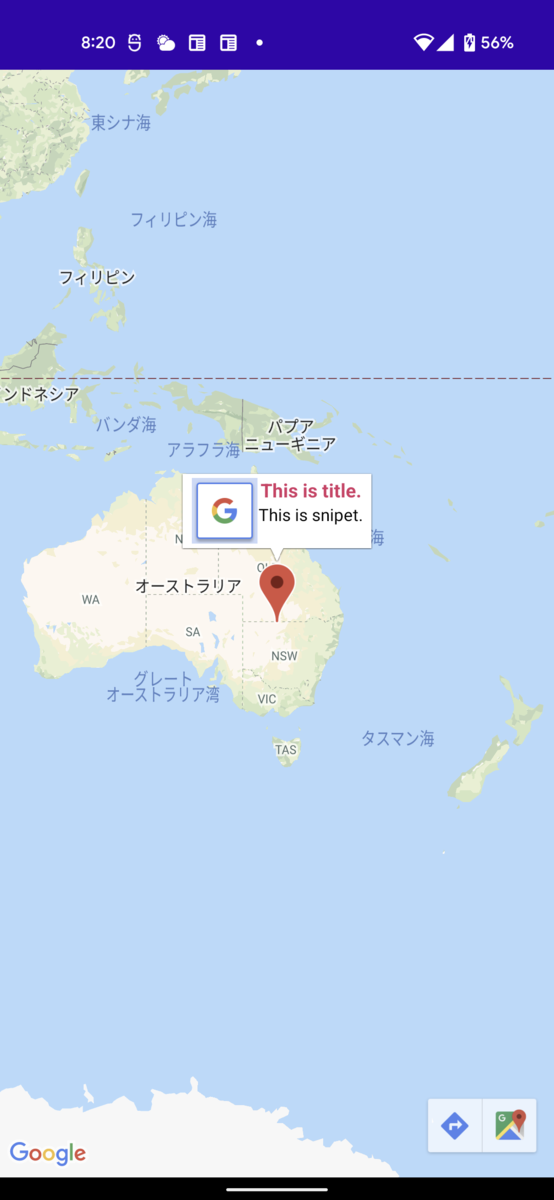
<?xml version="1.0" encoding="utf-8"?>
<LinearLayout xmlns:android="http://schemas.android.com/apk/res/android"
    xmlns:app="http://schemas.android.com/apk/res-auto"
    xmlns:tools="http://schemas.android.com/tools"
    android:layout_width="match_parent"
    android:layout_height="match_parent"
    android:orientation="horizontal">

    <!-- アイコンを表示するイメージビュー -->
    <ImageView
        android:id="@+id/imageView"
        android:layout_width="wrap_content"
        android:layout_height="wrap_content" />

    <LinearLayout
        android:layout_width="match_parent"
        android:layout_height="match_parent"
        android:orientation="vertical">
        <!-- タイトル用のテキストビュー -->
        <TextView
            android:id="@+id/tv_title"
            android:layout_width="match_parent"
            android:layout_height="wrap_content"
            android:gravity="center_horizontal"
            android:text="This is title."
            android:textColor="#E91E63"
            android:textSize="16sp"
            android:textStyle="bold" />

        <!-- 説明用のテキストビュー -->
        <TextView
            android:id="@+id/tv_snipet"
            android:layout_width="match_parent"
            android:layout_height="wrap_content"
            android:gravity="center_horizontal"
            android:text="This is snipet."
            android:textColor="@color/black" />
    </LinearLayout>
</LinearLayout>
続いて、ソースコードです。
package com.example.sampleaddmarker;

import androidx.annotation.NonNull;
import androidx.annotation.Nullable;
import androidx.fragment.app.FragmentActivity;

import android.os.Bundle;
import android.view.View;
import android.widget.ImageView;

import com.google.android.gms.maps.CameraUpdateFactory;
import com.google.android.gms.maps.GoogleMap;
import com.google.android.gms.maps.OnMapReadyCallback;
import com.google.android.gms.maps.SupportMapFragment;
import com.google.android.gms.maps.model.LatLng;
import com.google.android.gms.maps.model.Marker;
import com.google.android.gms.maps.model.MarkerOptions;
import com.example.sampleaddmarker.databinding.ActivityMapsBinding;

public class MapsActivity extends FragmentActivity implements OnMapReadyCallback {

    private GoogleMap mMap;
    private Marker marker;

    @Override
    protected void onCreate(Bundle savedInstanceState) {
        super.onCreate(savedInstanceState);

        setContentView(ActivityMapsBinding.inflate(getLayoutInflater()).getRoot());
        SupportMapFragment mapFragment = (SupportMapFragment) getSupportFragmentManager()
                .findFragmentById(R.id.map);
        mapFragment.getMapAsync(this);
    }

    @Override
    public void onMapReady(GoogleMap googleMap) {
        mMap = googleMap;
        mMap.moveCamera(CameraUpdateFactory.newLatLng(new LatLng(-34, 151)));
        mMap.setInfoWindowAdapter(new GoogleMap.InfoWindowAdapter() {

            @Override
            public View getInfoContents(@NonNull Marker marker) {
                // info_window_layout.xml のビューを生成
                View view = getLayoutInflater().inflate(R.layout.info_window_layout, null);

                // イメージビューを取得
                ImageView imgView = view.findViewById(R.id.imageView);

                // イメージビューにアイコンをセット
                imgView.setImageResource(R.drawable.common_google_signin_btn_icon_dark_focused);

                return view;
            }

            @Nullable
            @Override
            public View getInfoWindow(@NonNull Marker marker) {
                return null;
            }
        });

        // 長押しクリックイベントをセット
        mMap.setOnMapLongClickListener(new GoogleMap.OnMapLongClickListener() {
            @Override
            public void onMapLongClick(@NonNull LatLng latLng) {
                // 長押しクリックイベントをキャッチしたらマーカーを追加
                marker = mMap.addMarker(new MarkerOptions().position(latLng));
            }
        });
    }
}
今回のポイント
GoogleMap.InfoWindowAdapter
吹き出しをカスタマイズするためには、InfoWindowAdapterを実装して、setInfoWindowAdapter()にセットする必要があります。 具体的には、getInfoContents()とgetInfoWindow()を実装します。 getInfoWindow()は、情報ウィンドウ全体をカスタマイズできるのに対し、getInfoContents()はウィンドウのコンテンツのみをカスタマイズできます。
今回は、getInfoContents()を使用して、吹き出しの中のコンテンツのみをカスタマイズしています。 独自に定義したレイアウト(info_window_layout.xml)をinflateしています。
@Override
public View getInfoContents(@NonNull Marker marker) {
    // info_window_layout.xml のビューを生成
    View view = getLayoutInflater().inflate(R.layout.info_window_layout, null);

    // イメージビューを取得
    ImageView imgView = view.findViewById(R.id.imageView);

    // イメージビューにアイコンをセット
    imgView.setImageResource(R.drawable.common_google_signin_btn_icon_dark_focused);

    return view;
}
実行結果
これで、マップを長押しすると、アイコンが追加されるようになりました。
また、アイコンをタップすると、カスタマイズした吹き出しが表示されるようになりました。
参考にしたサイト
google maps for AndroidのinfoWindowをカスタマイズする - Qiita
リファレンス
Info Windows | Maps SDK for Android | Google Developers
GoogleMap.OnMapLongClickListener | Google Play services | Google Developers
Android GoogleMapのマーカーを端末の向きに応じて回転させる
前回は、GoogleMapに現在位置を表示するところまでやりました。
今回は、センサーを使用して端末が向いている向きに応じてマーカーを回転させたいと思います。
方針
- 向いている方向がわかりやすいようにマップに表示するマーカーをカスタマイズする。
- 端末の向き(方位角)は、SensorManagerを使用して取得した地磁気と加速度の値を利用して求める。
- センサーを扱う処理は、MySensorManagerクラスに集約し、getAzumith()で最新の方位角を取得できるようにする。
- 前回作成したMapsActivityクラスからMySensorManagerクラスを利用する。
ソースコード
/**
 * MySensorManagerクラス
 */
public class MySensorManager implements SensorEventListener {

    private final SensorManager sensorManager;
    private float[] gravity = new float[3];
    private float[] geomagnetic = new float[3];
    private float azimuth = 0.0f;

    /**
     * コンストラクタ
     * @param context コンテキスト
     */
    public MySensorManager(Context context) {
        // SensorManagerのインスタンス取得
        sensorManager = (SensorManager) context.getSystemService(Context.SENSOR_SERVICE);
    }

    @Override
    public void onSensorChanged(SensorEvent event) {

        // センサーのタイプに応じて値を取得
        switch (event.sensor.getType()) {
            case Sensor.TYPE_MAGNETIC_FIELD:
                geomagnetic = event.values.clone();
                break;
            case Sensor.TYPE_ACCELEROMETER:
                gravity = event.values.clone();
                break;
        }

        // 地磁気と加速度の両方の値が揃っていない場合、方位角の算出処理をスキップ
        if (null == geomagnetic || null == gravity) {
            return;
        }

        float[] R  = new float[16];     // 回転行列Rの値を格納する
        float[] value = new float[3];   // 方位角、ピッチ、ロールの回転角を格納する配列

        // 地磁気と加速度の値から回転行列を求める
        SensorManager.getRotationMatrix(R, null, gravity, geomagnetic);

        // 回転行列に基づいて方位角と傾きを算出
        SensorManager.getOrientation(R, value);

        // 方位角をラジアンから度に変換
        azimuth = (float) (value[0] * 180 / Math.PI);
    }

    @Override
    public void onAccuracyChanged(Sensor sensor, int accuracy) {}

    /**
     * センサー値の取得を開始する。
     */
    public void startSensor() {
        // 地磁気センサー値の取得を開始
        sensorManager.registerListener(
                this,
                sensorManager.getDefaultSensor(Sensor.TYPE_MAGNETIC_FIELD),
                SensorManager.SENSOR_DELAY_NORMAL);

        // 加速度センサー値の取得を開始
        sensorManager.registerListener(
                this,
                sensorManager.getDefaultSensor(Sensor.TYPE_ACCELEROMETER),
                SensorManager.SENSOR_DELAY_NORMAL);
    }

    /**
     * センサー値の取得を停止する。
     */
    public void stopSensor() {
        sensorManager.unregisterListener(this);
    }

    /**
     * 方位角を取得する。
     * @return 方位角
     */
    public float getAzimuth() {
        return azimuth;
    }
}
ソースのざっくり解説
- MySensorManagerクラスは、SensorEventListenerをimplements
- コンストラクタで、SensorManagerのインスタンスを取得
- startSensor()で、地磁気と加速度の取得を開始
- stopSensor()で、地磁気と加速度の取得を停止
- onSensorChanged()は、センサー値が変更した際に呼び出される
onSensorChanged()にて、取得したセンサー値から方位角を算出 - getAzumith()で、方位角を返却
今回のポイント
マーカーのアイコンをカスタマイズ
向きがわかりやすいようにアイコンをカスタマイズします。
アイコン画像をdrawableフォルダに配置することで、オリジナル画像をマーカーとして使うことができます。
BitmapDescriptorFactory.fromResource()で指定してます。
@Override
public void onMapReady(GoogleMap googleMap) {
    mMap = googleMap;
    LatLng sydney = new LatLng(-34, 151);
    marker = mMap.addMarker(new MarkerOptions().position(sydney).title("Marker in Sydney"));
    marker.setIcon(BitmapDescriptorFactory.fromResource(R.drawable.icon));
    mMap.moveCamera(CameraUpdateFactory.newLatLng(sydney));
}
方位角の算出
方位角は、onSensorChanged()のメソッド内で計算しています。
今回は、ソースコードのコメントに私自身の解釈で説明を記載しました。
正直、地磁気と加速度の値から回転行列を求め、回転行列から方位角が算出される仕組みまでは理解していません。下記の参考サイトを参考にさせていただきました。
個人的なポイントとしては、MySensorManagerクラスにセンサー関連の処理を集約させることで、MapsActivityクラスのコード量を減らしているところが工夫した点です。
Marker.setRotation()でアイコンの向きをセット
方位角は、MySensorManager.getAzimuth()で取得し、setRotation()でセットしています。
locationCallback = new LocationCallback() {
    @Override
    public void onLocationResult(@NonNull LocationResult locationResult) {
        super.onLocationResult(locationResult);
        Location location = locationResult.getLastLocation();
        LatLng latlng = new LatLng(location.getLatitude(), location.getLongitude());
        mMap.moveCamera(CameraUpdateFactory.newLatLng(latlng));
        marker.setPosition(latlng);
        marker.setRotation(mySensorManager.getAzimuth());
    }
};
実行結果
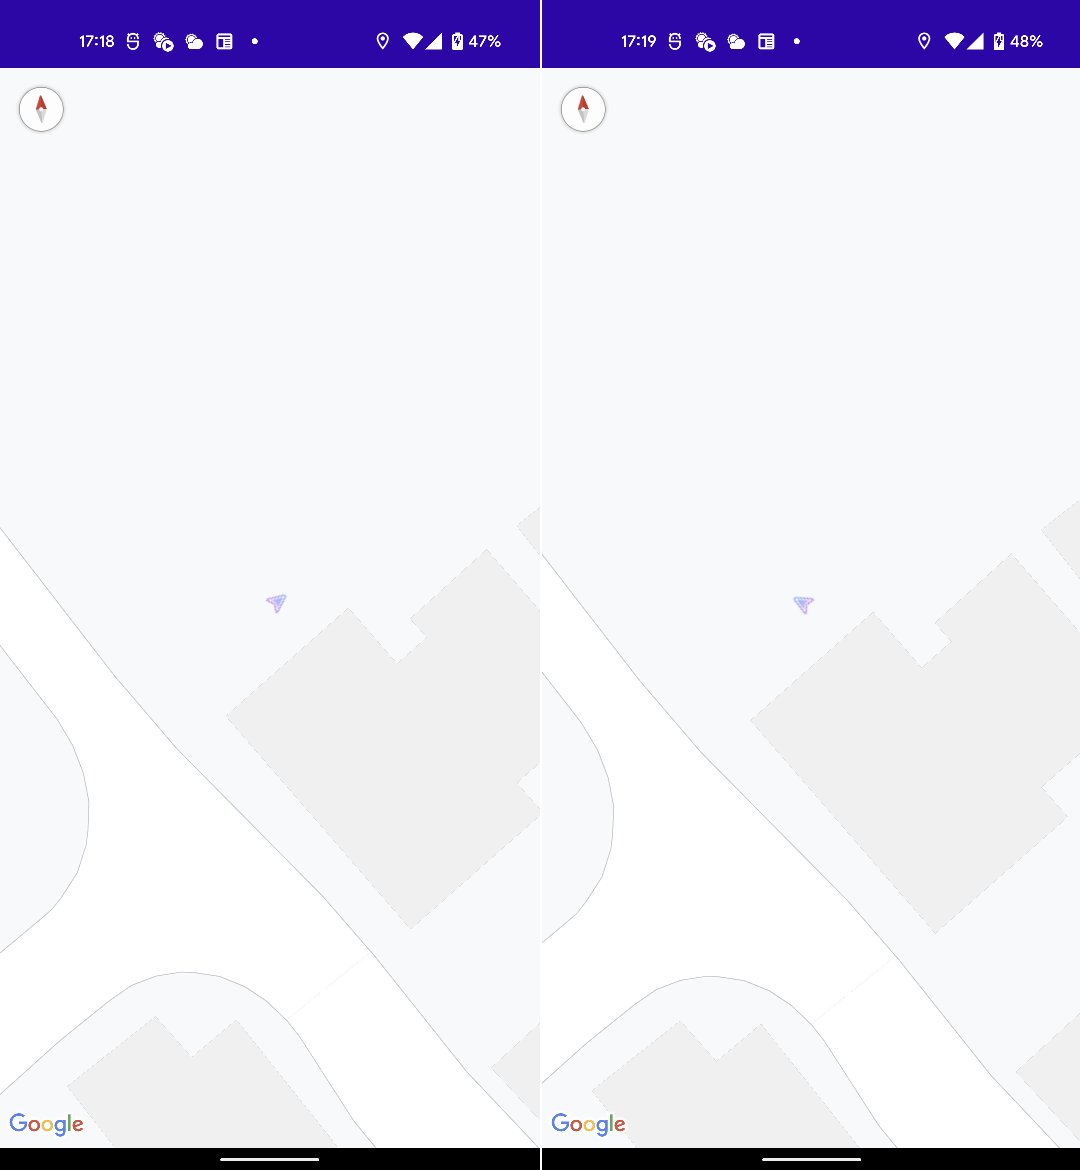
実行すると、このように向きに応じてマーカーが回転するようになりました。
デフォルトのマーカーよりも移動している感じが格段にわかりやすくなりました。
 なお、マーカーのアイコンは、icon8の素材を使用させていただいています。
参考にしたサイト
端末の向きと傾きを取得する方法 - 加速度センサーと地磁気センサーの利用 - Androidプログラミングの基礎 - Android 開発入門
Androidで世界座標系の加速度と方位を取得する - Qiita
リファレンス
Sensor | Android Developers
SensorManager | Android Developers
SensorEventListener | Android Developers
icon8
FusedLocationProviderClientで取得した現在位置をGoogleMapに表示する
前回は、アプリにGoogleMapを表示するところまでやってみました。
今回は、Google Play ServiceのFusedLocationProviderClientを使って、GoogleMapに現在位置を表示します。
目次
今回の本題ではありませんが、端末の位置情報にアクセスするためには、ユーザに位置情報へのアクセスを許可してもらう必要があります。
やることは2つです。 実行するとこのように現在位置が表示されます。 LatLng | Google Play services | Google Developers ソースコード
/**
 * MapsActivityクラス
 */
public class MapsActivity extends FragmentActivity implements OnMapReadyCallback {

    private GoogleMap mMap;
    private ActivityMapsBinding binding;
    private Marker marker;
    private FusedLocationProviderClient flpClient = null;
    private LocationCallback locationCallback = null;

    @Override
    protected void onCreate(Bundle savedInstanceState) {
        super.onCreate(savedInstanceState);

        binding = ActivityMapsBinding.inflate(getLayoutInflater());
        setContentView(binding.getRoot());

        SupportMapFragment mapFragment = (SupportMapFragment) getSupportFragmentManager()
                .findFragmentById(R.id.map);
        mapFragment.getMapAsync(this);

        // 位置情報が変更された際に、通知を受け取るコールバックメソッドを定義
        locationCallback = new LocationCallback() {
            @Override
            public void onLocationResult(@NonNull LocationResult locationResult) {
                super.onLocationResult(locationResult);
                Location location = locationResult.getLastLocation();
                LatLng latlng = new LatLng(location.getLatitude(), location.getLongitude());
                marker.setPosition(latlng);
                mMap.moveCamera(CameraUpdateFactory.newLatLng(latlng));
            }
        };
    }

    @Override
    protected void onResume() {
        super.onResume();
        startPositioning();
    }

    @Override
    protected void onPause() {
        super.onPause();
        stopPositioning();
    }

    @Override
    public void onMapReady(GoogleMap googleMap) {
        mMap = googleMap;
        LatLng sydney = new LatLng(-34, 151);
        marker = mMap.addMarker(new MarkerOptions().position(sydney).title("Marker in Sydney"));
        mMap.moveCamera(CameraUpdateFactory.newLatLng(sydney));
    }

    @Override
    public void onRequestPermissionsResult(int requestCode, String permissions[], int[] grantResults) {
        super.onRequestPermissionsResult(requestCode, permissions, grantResults);
        if (1 != requestCode) {
            return;
        }

        // ユーザが許可してくれた場合は、位置情報の取得を開始する
        if (grantResults.length > 0 && grantResults[0] == PackageManager.PERMISSION_GRANTED) {
            startPositioning();
        } else {
            Toast.makeText(this, "Permission Error.", Toast.LENGTH_SHORT).show();
        }
    }

    /**
     * 位置情報の取得を開始する。
     */
    private void startPositioning() {

        // 位置情報へのアクセス許可チェック
        if (!checkPermission()) {
            return;
        }

        // 位置情報の取得を開始する
        flpClient = LocationServices.getFusedLocationProviderClient(this);
        LocationRequest request = LocationRequest.create();
        request.setInterval(1000);
        request.setPriority(LocationRequest.PRIORITY_HIGH_ACCURACY);

        // 位置情報が変更された際は、locationCallbackで受け取る
        flpClient.requestLocationUpdates(request, locationCallback, null);
    }

    /**
     * 位置情報の取得を停止する。
     */
    private void stopPositioning() {
        if (null != flpClient) {
            flpClient.removeLocationUpdates(locationCallback);
        }
    }

    /**
     * 位置情報へのアクセスが許可されているかチェックする。<br>
     * 許可されていてない場合、パーミッションリクエストを行う。
     * @return ture:許可 / false:未許可
     */
    private boolean checkPermission() {
        // アクセス許可チェック
        if (checkSelfPermission(ACCESS_FINE_LOCATION) == PackageManager.PERMISSION_GRANTED) {
            return true;
        }

        // パーミッションリクエスト
        requestPermissions(new String[] {ACCESS_FINE_LOCATION},1);
        return false;
    }
}
ソースのざっくり解説
今回のポイント
パーミッションをチェック&リクエストする
<uses-permission android:name="android.permission.ACCESS_FINE_LOCATION" />
パーミッションチェックを行っていない状態で、FusedLocationProviderClientを使って位置情報の更新を開始しようとするとエラーになります。
そこで、checkPermission()を呼び出し、位置情報へのアクセスの許可状態のチェックと許可されていない場合は、リクエストを行います。

ユーザの選択結果をonRequestPermissionsResult()で受け取り処理しています。FusedLocationProviderClientを使って位置情報の更新をリクエストする
private void startPositioning() {

    // 位置情報へのアクセス許可チェック
    if (!checkPermission()) {
        return;
    }

    // 位置情報のリクエストを生成する
    LocationRequest request = LocationRequest.create();
    request.setInterval(1000);
    request.setPriority(LocationRequest.PRIORITY_HIGH_ACCURACY);

    // 位置情報の更新をリクエストする
    flpClient = LocationServices.getFusedLocationProviderClient(this);
    flpClient.requestLocationUpdates(request, locationCallback, null);
}
LocationAPIを使用するためには、build.gradle(:app)に以下を追加します。implementation 'com.google.android.gms:play-services-location:19.0.1'
取得した現在位置でマップの中心座標とアイコンの座標を変更する
locationCallback = new LocationCallback() {
    @Override
    public void onLocationResult(@NonNull LocationResult locationResult) {
        super.onLocationResult(locationResult);
        Location location = locationResult.getLastLocation();
        LatLng latlng = new LatLng(location.getLatitude(), location.getLongitude());
        marker.setPosition(latlng);
        mMap.moveCamera(CameraUpdateFactory.newLatLng(latlng));
    }
};
実行結果
リファレンス
LocationServices | Google Play services | Google Developers
LocationResult | Google Play services | Google Developers
LocationRequest | Google Play services | Google Developers
LocationCallback | Google Play services | Google Developers
FusedLocationProviderClient | Google Play services | Google Developers