Android GoogleMapのInfoWindow(吹き出し)をカスタマイズする
今回は、
- GoogleMapのタッチイベントを拾ってアイコンを表示する
- InfoWindow(吹き出し)をカスタマイズする
の2点をやっていきたいと思います。
方針
- 長押しクリックイベントは、GoogleMap.setOnMapLongClickListener()を使って拾う
- 吹き出しのカスタマイズは、独自のレイアウトを定義する
- レイアウトは、左側にアイコン、右側にタイトルと説明を表示する
ソースコード
先にレイアウトです。
info_window_layout.xml
<?xml version="1.0" encoding="utf-8"?>
<LinearLayout xmlns:android="http://schemas.android.com/apk/res/android"
    xmlns:app="http://schemas.android.com/apk/res-auto"
    xmlns:tools="http://schemas.android.com/tools"
    android:layout_width="match_parent"
    android:layout_height="match_parent"
    android:orientation="horizontal">

    <!-- アイコンを表示するイメージビュー -->
    <ImageView
        android:id="@+id/imageView"
        android:layout_width="wrap_content"
        android:layout_height="wrap_content" />

    <LinearLayout
        android:layout_width="match_parent"
        android:layout_height="match_parent"
        android:orientation="vertical">
        <!-- タイトル用のテキストビュー -->
        <TextView
            android:id="@+id/tv_title"
            android:layout_width="match_parent"
            android:layout_height="wrap_content"
            android:gravity="center_horizontal"
            android:text="This is title."
            android:textColor="#E91E63"
            android:textSize="16sp"
            android:textStyle="bold" />

        <!-- 説明用のテキストビュー -->
        <TextView
            android:id="@+id/tv_snipet"
            android:layout_width="match_parent"
            android:layout_height="wrap_content"
            android:gravity="center_horizontal"
            android:text="This is snipet."
            android:textColor="@color/black" />
    </LinearLayout>
</LinearLayout>
続いて、ソースコードです。
package com.example.sampleaddmarker;

import androidx.annotation.NonNull;
import androidx.annotation.Nullable;
import androidx.fragment.app.FragmentActivity;

import android.os.Bundle;
import android.view.View;
import android.widget.ImageView;

import com.google.android.gms.maps.CameraUpdateFactory;
import com.google.android.gms.maps.GoogleMap;
import com.google.android.gms.maps.OnMapReadyCallback;
import com.google.android.gms.maps.SupportMapFragment;
import com.google.android.gms.maps.model.LatLng;
import com.google.android.gms.maps.model.Marker;
import com.google.android.gms.maps.model.MarkerOptions;
import com.example.sampleaddmarker.databinding.ActivityMapsBinding;

public class MapsActivity extends FragmentActivity implements OnMapReadyCallback {

    private GoogleMap mMap;
    private Marker marker;

    @Override
    protected void onCreate(Bundle savedInstanceState) {
        super.onCreate(savedInstanceState);

        setContentView(ActivityMapsBinding.inflate(getLayoutInflater()).getRoot());
        SupportMapFragment mapFragment = (SupportMapFragment) getSupportFragmentManager()
                .findFragmentById(R.id.map);
        mapFragment.getMapAsync(this);
    }

    @Override
    public void onMapReady(GoogleMap googleMap) {
        mMap = googleMap;
        mMap.moveCamera(CameraUpdateFactory.newLatLng(new LatLng(-34, 151)));
        mMap.setInfoWindowAdapter(new GoogleMap.InfoWindowAdapter() {

            @Override
            public View getInfoContents(@NonNull Marker marker) {
                // info_window_layout.xml のビューを生成
                View view = getLayoutInflater().inflate(R.layout.info_window_layout, null);

                // イメージビューを取得
                ImageView imgView = view.findViewById(R.id.imageView);

                // イメージビューにアイコンをセット
                imgView.setImageResource(R.drawable.common_google_signin_btn_icon_dark_focused);

                return view;
            }

            @Nullable
            @Override
            public View getInfoWindow(@NonNull Marker marker) {
                return null;
            }
        });

        // 長押しクリックイベントをセット
        mMap.setOnMapLongClickListener(new GoogleMap.OnMapLongClickListener() {
            @Override
            public void onMapLongClick(@NonNull LatLng latLng) {
                // 長押しクリックイベントをキャッチしたらマーカーを追加
                marker = mMap.addMarker(new MarkerOptions().position(latLng));
            }
        });
    }
}
今回のポイント
GoogleMap.InfoWindowAdapter
吹き出しをカスタマイズするためには、InfoWindowAdapterを実装して、setInfoWindowAdapter()にセットする必要があります。 具体的には、getInfoContents()とgetInfoWindow()を実装します。 getInfoWindow()は、情報ウィンドウ全体をカスタマイズできるのに対し、getInfoContents()はウィンドウのコンテンツのみをカスタマイズできます。
今回は、getInfoContents()を使用して、吹き出しの中のコンテンツのみをカスタマイズしています。 独自に定義したレイアウト(info_window_layout.xml)をinflateしています。
@Override
public View getInfoContents(@NonNull Marker marker) {
    // info_window_layout.xml のビューを生成
    View view = getLayoutInflater().inflate(R.layout.info_window_layout, null);

    // イメージビューを取得
    ImageView imgView = view.findViewById(R.id.imageView);

    // イメージビューにアイコンをセット
    imgView.setImageResource(R.drawable.common_google_signin_btn_icon_dark_focused);

    return view;
}
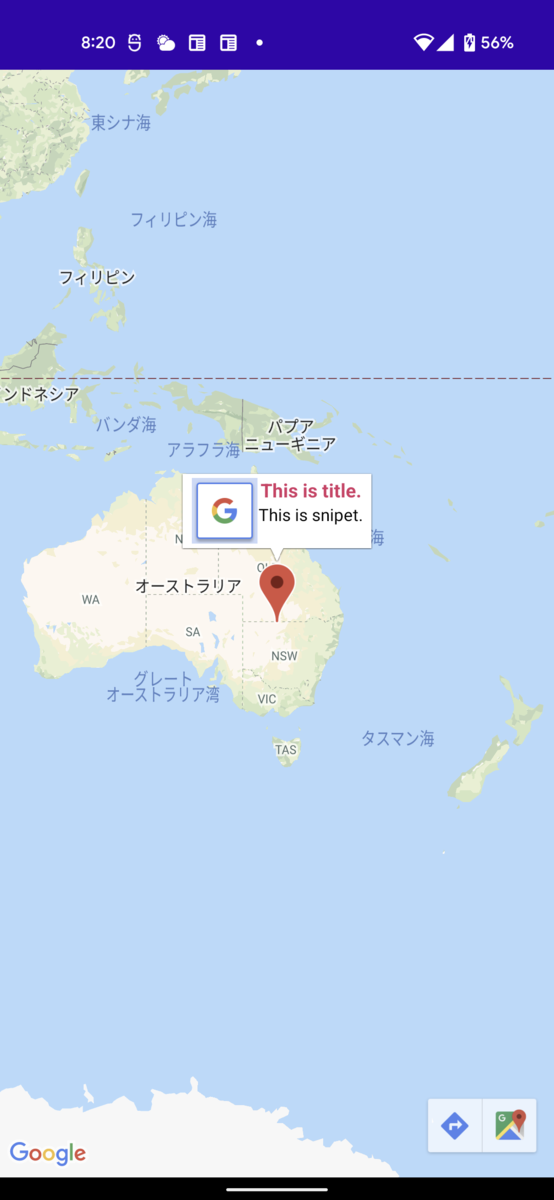
実行結果
これで、マップを長押しすると、アイコンが追加されるようになりました。
また、アイコンをタップすると、カスタマイズした吹き出しが表示されるようになりました。
参考にしたサイト
google maps for AndroidのinfoWindowをカスタマイズする - Qiita
リファレンス
Info Windows | Maps SDK for Android | Google Developers
GoogleMap.OnMapLongClickListener | Google Play services | Google Developers